热门文章
联系我们
联系人:寇先生
微信公众号:

用 SAP HANA 和 ADO.NET 创建 一个 C# 程序
知识分享不易,转载请标注来源:http://www.blenderkou.top/contents/10/3185.html 版权申明:欢迎转载,但请注明出处。 一些博文中的参考内容因时间久远找不到来源了没有注明,如果侵权请联系我删除。
转载,原文:https://blogs.sap.com/2015/04/15/creating-a-c-application-using-sap-hana-and-adonet/
Introduction
The following tutorial demonstrates how to create a .NET application that retrieves information from an SAP HANA database. ADO.NET is a component of the .NET Framework that links a database connection to a set of predefined classes and is primarily used to access and manipulate data inside a relational database. This tutorial implements a sample application to show the different techniques and options available to a HANA user when writing a solution in C# and .NET.
The accompanying code for this project is available for download here.
Prerequisites
To create the sample application in this tutorial, you must have an available HANA database installed. You must also have the appropriate credentials to access the data you need in that system. If you do not have a database on premise, you can sign up for a free developer account using HANA Cloud Platform.
The mock data used for this demo was taken from the SAP HANA Interactive Education (SHINE) schema, which you can find and import via the following documentation. This schema is useful for testing HANA application logic without the need to worry about migrating existing data.
The tools used for this sample application were:
Microsoft Visual Studio 2012
HANA SPS09 Rev 91
Windows 8
.NET Framework 4.5
Using ADO.NET with SAP HANA
In order to create an application using SAP HANA with ADO.NET, you must add the HANA Driver to your project. This driver will be installed by the HANA Client if the machine has Visual Studio installed beforehand.
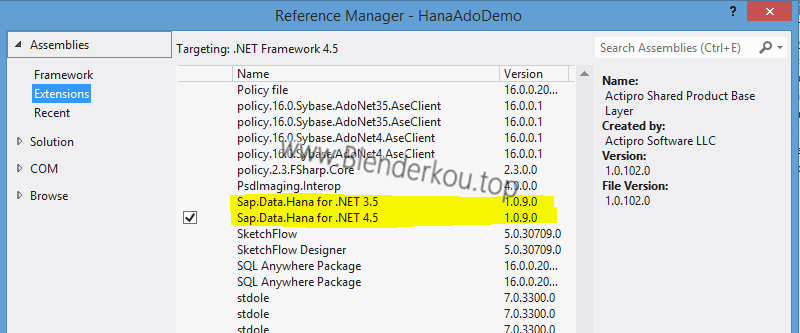
To add it to your project, right click on your project’s References folder in the Solution Explorer and select “Add Reference…” Search for the “Sap.Data.Hana for .NET 4.5” reference in the .NET tab and click OK. If you are using a different version of .NET, please select that one from the list instead.
When using any of the ADO.NET classes you need to also include the “Sap.Data.Hana” library in the appropriate namespaces.
Once you have your environment configured, you can use ADO.NET. For those familiar with ADO.NET, you can start working right away by simply replacing the prefix of the classes you use with “Hana”.
For example, the following equivalent classes are available:
HanaDataAdapter | OdbcDataAdapter |
HanaDataReader | OdbcDataReader |
HanaCommand | OdbcCommand |
HanaConnection | OdbcConnection |
For those unfamiliar with ADO.NET, I put together a simple demo application that uses some of the features available. Although there are many different ways to accomplish similar results, I chose to write as much C# code as possible, for the sake of learning something new.
Creating the Application
This sample application takes advantage of the product data and employee data within the SHINE database. There are two different tabs of information, displayed in different ways. The first tab will display the different products available in a grid view, with additional details populated when a row is clicked. The second tab will have a simple TreeView of the employee data sorted according to gender.
To begin creating the application, create a new Windows Forms Application in Visual Studio by going to File > New > Project and selecting ‘Windows Forms Application’. At this point you can follow the steps above to add the ADO.NET driver into your project.
Double click on the form to create a loading event listener. To hide your credentials from users of the application, create a connection string in your project’s App.config file.
<connectionStrings>
     <add name="Hana" connectionString="Server=HOST:PORT;UserName=USER;Password=PASSWORD" providerName="Sap.Data.Hana" /></connectionStrings>
Use port 3##15, where the ## refers to your HANA instance number. For example, a 00 instance would refer to port 30015.
Next, add the following code to connect to your HANA database in this event listener.
conn = new HanaConnection( System.Configuration.ConfigurationManager.ConnectionStrings["Hana"].ConnectionString);conn.Open();
Declare the HanaConnection outside of your Form_Load handler so that you can access it later. We are going to leave the connection open so that we can access the product details without having to reconnect every time. For applications with multiple users, the connection should be closed whenever possible to limit the number of connections being made to the database at a given time.
In this example, I’ve also saved constants with the schema name and important SHINE table names along with the HanaConnection. This is a good practice for larger applications where the schema may change, and can also help shorten the SQL query code significantly.
using Sap.Data.Hana;namespace HANADemo{
     public partial class Form1 : Form
     {
          HanaConnection conn;
          const string SCHEMA = "SAP_HANA_DEMO";
          const string PRODUCTS_TABLE = "sap.hana.democontent.epm.data::EPM.MD.Products";
          const string PARTNER_TABLE = "sap.hana.democontent.epm.data::EPM.MD.BusinessPartner";
          const string TEXT_TABLE = "sap.hana.democontent.epm.data::EPM.Util.Texts";
          const string EMPLOYEE_TABLE = "sap.hana.democontent.epm.data::EPM.MD.Employees";
          public Form1()
          {
               InitializeComponent();
          }
          private void Form1_Load(object sender, EventArgs e)
          {
               conn = new HanaConnection( System.Configuration.ConfigurationManager.ConnectionStrings["Hana"].ConnectionString);
               conn.Open();
          }
     }}
In the Designer view, drag and drop a TabControl into your form. You can also change the text on your tab to reflect the data that will be inside, in this case ‘Employees’ and ‘Products’. Next, add a DataGridView from the Data tab of your toolbox into your Product tab. Optionally change the name of this DataGridView to ‘productGridView’.
In the same Form_Load event handler, create a new HanaAdapter with the query you would like to use to populate the DataGridView.
HanaDataAdapter dataAdapter = new HanaDataAdapter("SELECT t.TEXT AS \"Name\", p.PRODUCTID as \"Product ID\", p.CATEGORY as \"Category\"" +" FROM \"" + SCHEMA + "\".\"" + PRODUCTS_TABLE + "\" p INNER JOIN \"" + SCHEMA + "\".\"" + TEXT_TABLE + "\" t ON t.TEXTID = p.NAMEID " + "INNER JOIN \"" + SCHEMA + "\".\"" + PARTNER_TABLE + "\" bp ON p.\"SUPPLIERID.PARTNERID\" = bp.PARTNERID", conn);Create a new DataTable and use your adapter to fill the table.
DataTable testTable = new DataTable();dataAdapter.Fill(testTable);
Finally, set the DataSource of your DataGridView to be the DataTable linked to your query.
productGridView.DataSource = testTable;//Format the grid (optional)productGridView.AutoResizeColumns(DataGridViewAutoSizeColumnsMode.AllCells);
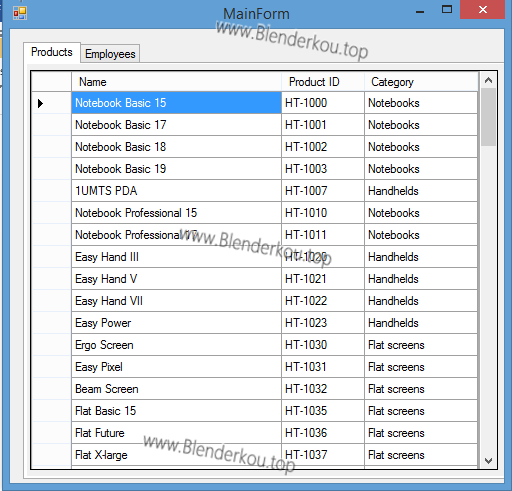
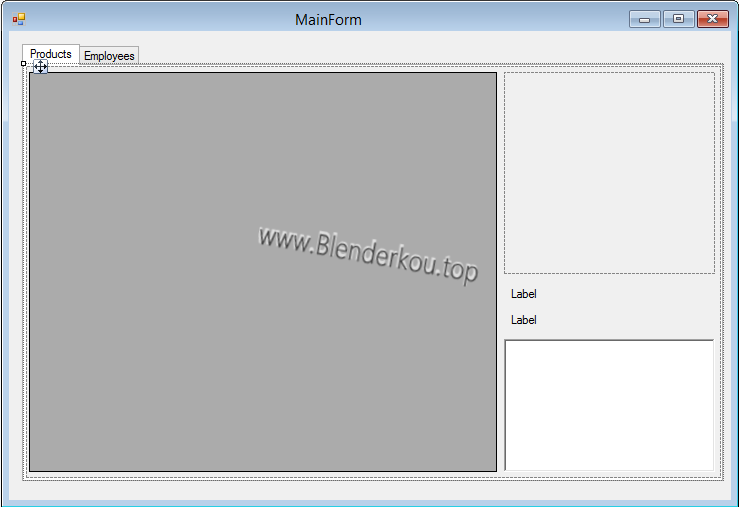
Once you have done this, the results should look similar to the following.
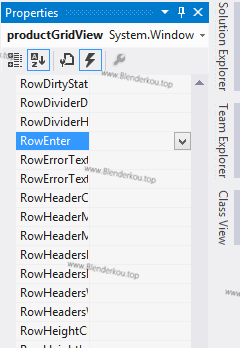
You can also display more detailed information for each product by adding an event handler linked to the RowEnter event. To do so, select the DataGridView in the designer and view its properties by right-clicking and selecting properties. Enter the Events tab (the lightning bolt) and double click the RowEnter event.
Since we pulled the primary key (PRODUCT_ID) into the DataGridView, we can use it in a new query to grab more details about the product. Using a HanaCommand this time, we will get a HanaDataReader that we can use to access additional product details.
As an example, here is a HanaCommand that uses a very simple query to select the price of a product given its primary key.
HanaCommand cmd = new HanaCommand("SELECT PRICE FROM \"" + SCHEMA + "\".\"" + PRODUCTS_TABLE + "\" WHERE PRODUCTID = '" + PK_ID + "'", conn);HanaDataReader productInfoReader = cmd.ExecuteReader();productInfoReader.Read();string price = productInfo.GetString(0);As you can see, the DataReader classes are used to return rows that you can iterate through. In this case, because we are using a primary key in the query, only one result should be returned. However, when you are dealing with multiple results you can simply run:
while (productInfoReader.Read()){
     //Use results}
To get the primary key of the selected row, you can access the values of your DataGridView directly. In this case my DataGridView was called ‘productGridView’.
private void productGridView_RowEnter(object sender, DataGridViewCellEventArgs e){
     if (productGridView[1, e.RowIndex] != null)
     {
          string PK_ID = productGridView[1, e.RowIndex].Value.ToString();
          HanaDataReader productInfoReader = null;
          try
          {
               //Get the product description, category, and price from the database.
               HanaCommand cmd = new HanaCommand("SELECT t.TEXT, p.CATEGORY, " + "p.PRICE, p.CURRENCY FROM \"" + SCHEMA + "\".\"" + PRODUCTS_TABLE + "\" p INNER JOIN \"" + SCHEMA + "\".\"" + TEXT_TABLE + "\" t ON t.TEXTID = p.DESCID " + " WHERE p.PRODUCTID = '" + PK_ID + "'", conn);
              productInfoReader = cmd.ExecuteReader();
               productInfoReader.Read();
          }
          catch (Exception exc)
          {
               //For debugging purposes
               MessageBox.Show(exc.ToString());
          }
          finally
          {
               if (productInfoReader != null)
               {
                    productInfoReader.Close();
               }
          }
     }}
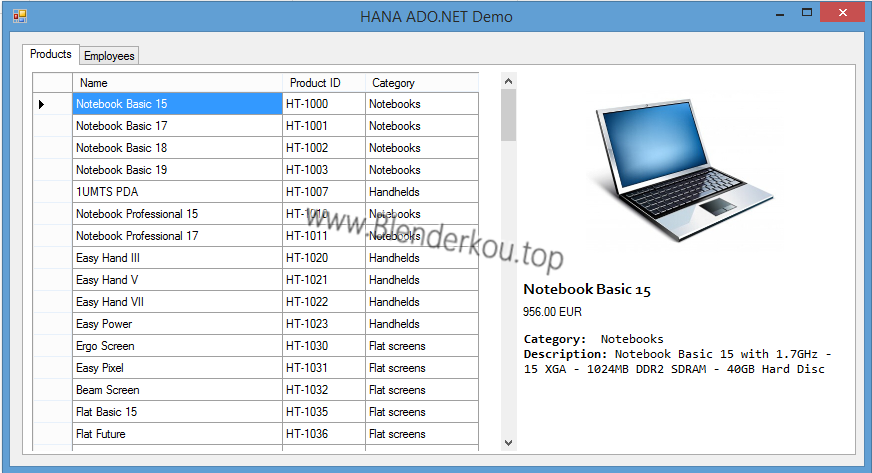
In order to display the data, I added a RichTextBox with the name ‘productDescription’, a PictureBox with the name ‘displayPicture’, and two Labels named ‘productPrice’ and ‘productName’ beside the DataGridView.
Feel free to change the properties of these elements to remove borders, change fonts and background colours, etc.
To display the images, I grouped the products into their respective categories and had a single image display for each category. I added each of the resources into the project and matched the file name to the categories in the SHINE database. I also added a default image for when the category was not found. To add images to your project:
Expand the Properties folder of your project in the Solution Explorer.
Double click on Resources.resx.
Under ‘Add Resource’ select ‘Add Existing File’ and import your images.
Once this was complete, I set the properties of the various elements we added previously to reflect the product that was being selected.
The resulting code should now look similar to this.
private void productGridView_RowEnter(object sender, DataGridViewCellEventArgs e){
     if (productGridView[1, e.RowIndex] != null)
     {
          //Get the primary key (productID) and product name from the grid view
          string PK_ID = productGridView[1, e.RowIndex].Value.ToString();
          string name = productGridView[0, e.RowIndex].Value.ToString();
          HanaDataReader productInfo = null;
          try
          {
               //Get the product description, category, and price from the database.
               HanaCommand cmd = new HanaCommand("SELECT t.TEXT, p.CATEGORY, " + "p.PRICE, p.CURRENCY FROM \"" + SCHEMA + "\".\"" + PRODUCTS_TABLE + "\" p INNER JOIN \"" + SCHEMA + "\".\"" + TEXT_TABLE + "\" t ON t.TEXTID = p.DESCID " + " WHERE p.PRODUCTID = '" + PK_ID + "'", conn);
               productInfo = cmd.ExecuteReader();
               productInfo.Read();
               //Display the price and currency
               productPrice.Text = productInfo.GetString(2) + " " + productInfo.GetString(3);
               //Display the product name again
               productName.Text = name;
               //Display the product description and category using RTF
               string category = productInfo.GetString(1);
               productDescription.Rtf = "{\\rtf1\\ansi\\deff0 {\\fonttbl {\\f0 Consolas;}}\\f0\\fs20" + "{\\b Category: } " + category + "\\line {\\b Description: }" + productInfo.GetString(0) + "}";
               //Find the product image using the product category
               category = category.Replace(' ', '_');
               object imgObj = Resources.ResourceManager.GetObject(category);
               //Set and resize the product image
               displayPicture.Image = (imgObj == null) ? Resources._default : (Image)imgObj;
               displayPicture.SizeMode = PictureBoxSizeMode.Zoom;
          }
          catch (Exception exc)
          {
               MessageBox.Show(exc.ToString());
          }
          finally
          {
               if (productInfo != null)
               {
                    productInfo.Close();
               }
          }
     }}
And here is the updated application.
Filling TreeNodes
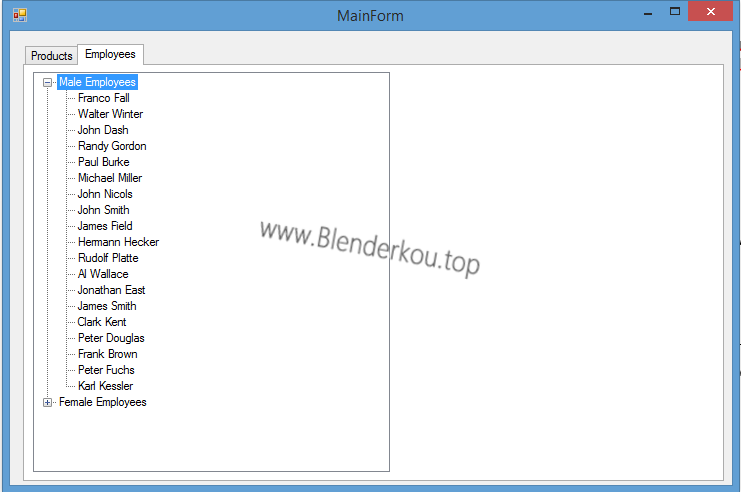
Now we can begin working on our second tab. Add a TreeView to your Employees tab. Use the ‘Enter’ event of your tab to load data into the tree view. In order to load the data into the view, simply iterate through the results of another query and sort the data into an array of TreeNodes. You can then create new parent TreeNodes with these arrays.
The final step is adding these parent TreeNodes to your TreeView, in this example named ‘genderTreeView’.
privatevoid employeesTab_Enter(object sender, EventArgs e)       {
     try
     {
          //Read the employee data from the database
          HanaCommand data = new HanaCommand(
          "SELECT \"NAME.FIRST\", \"NAME.LAST\", ***" + " FROM \"" + SCHEMA + "\".\"" + EMPLOYEE_TABLE + "\"", conn);
          HanaDataReader reader = data.ExecuteReader();
          var maleList = new List<TreeNode>();
          var femaleList = new List<TreeNode>();
          //Iterate through each employee
          while (reader.Read())
          {
               //Create display data (full name)
               TreeNode employeeInfo = new TreeNode(reader.GetString(0) + " " + reader.GetString(1));
               //Sort the employee into the different categories.
               string gender = reader.GetString(2);
               if (gender == "M")
               {
                    maleList.Add(employeeInfo);
               }
               else
               {
                    femaleList.Add(employeeInfo);
               }
          }
          //Create TreeNodes with the sorted lists
          TreeNode maleEmployees = new TreeNode("Male Employees", maleList.ToArray());
          TreeNode femaleEmployees = new TreeNode("Female Employees", femaleList.ToArray());
          //Add the nodes to the view
          genderTreeView.Nodes.Add(maleEmployees);
          genderTreeView.Nodes.Add(femaleEmployees);
     }
     catch (Exception exc)
     {
          MessageBox.Show(exc.ToString());
     }}
The resulting TreeView should look similar to the following.
Conclusion
The ADO.NET driver for HANA is a powerful tool that brings the full capabilities of the ADO.NET library into your HANA applications. I hope that this sample application has been useful for those interested in learning how to integrate their .NET apps with SAP HANA.
知识分享不易,转载请标注来源:http://www.blenderkou.top/contents/10/3185.html 版权申明:欢迎转载,但请注明出处。 一些博文中的参考内容因时间久远找不到来源了没有注明,如果侵权请联系我删除。
